Showing posts with label Treat box. Show all posts

Sunday, January 29, 2012

Sweet Valentine's Day Card and Treat Box with a Tutorial!

Valentine's Day is fast approaching and I have begun working on my cards and gifts.
This card will be for someone extra special in my life and I am sure she will love it:
Images: Audrey's Heart by The Stamping Boutique
I also needed a Treat Box for a wonderful friend and this is the finished project:
Images: Wagon Full of Hearts by The Stamping Boutique


It was so much working on this treat box that I made a tutorial and am sharing it with you!

Window Treat Box Tutorial
Images: Audrey's Heart and Wagon Full of Hearts by The Stamping Boutique
Supplies:

  • 9 in x 8 in - white cardstock
  • 11 in x 4 in - red cardstock
  • 12 in x 6 in -pink cardstock
  • 12 in x 6 in - patterned paper
  • 2.75 in x 3.75 in - acetate
  • 2.5 in x 3.5 in - colored image, optional
  • twine
  • strong adhesive
Download Template: Here, adjust printer settings for legal paper, page scaling: none
How  to:

Cut a 9 inch x 8 inch, piece of cardstock.
On the wider side score at 0.5 in, 1.5 in, 2.5 in, 6.5 in, 7.5 in, and 8.5 inches.
On the other side score at 0.5 in, 1.5 in, 2.5 in, 5.5 in, 6.5 in, and 7.5 inches.
Using the template provided, as you guide cut out the box.

 Fold along the dashed lines (blue).

Add adhesive to the small side flaps and assemble the base of the box.
Add adhesive to the four flaps on the sides and fold them inside the box, making sure that they are aligned with the sides of the box.

Cut a piece of cardstock 11 inches x 4 inches.
Score and fold at 3in, 4in, 7in, 8 in and 11 inches.
Using a die cut or punch create a window on one of the outside flaps.

Cut the following pieces:
    From patterned paper:
  • 2 – 2.75 in x 3.75 in (punch a window using the same punch used to create the window on the cover)
  • 2 – 3.5 in x 0.5 in
  • 2 – 2.5 in x 0.5 in
   From cardstock:
  •  1 – 2.75 in x 3.75 in
  •  2 – 3.75 in x 0.75 in
  •  2 - 2.75 in x 0.75 in
  •  2- Frame pieces of choice for the window opening
  From acetate:
  •  1 - 2. 5 in x 3.5 in
Add a piece of acetate to the inside of the cut:
Add the patterned paper background to the front of the box; remember to add the twine.
Add a frame around the window.
Repeat for the inside of the cover.
Assemble the side panels and the colored image.
Glue side panels and image to the outside of the cover piece (being careful of the orientation of the image).
Glue side panels to the base box.
Apply a strong adhesive to the center panel and glue the base box.

Cut a piece of patterned paper 2.75 inches x 3.75 inches and glue to the inside flap.
Glue a piece of plain cardstock for journaling.

Add adhesive to the folded sides of the cover.

Glue the base box to the cover sides.
This is the finished project:
Opened View
Closed View
I just had to share one photo of the box filled with candies!!
Have fun!
Hugs,
Julia

Tuesday, December 27, 2011

So What is Hybrid? Challenge at The Crafter's Cafe

We are celebrating the December Open House at The Crater's Cafe.
I have been busy working on my projects and would love to share them with you.
This is the card that I created for the What is Hybrid? Challenge sponsored by Wendybird Designs:


Used Treat Tent template and Pink and Chocolate Paper Pack from JLJ Designs

Thanks!
Love,
Julia

Wednesday, October 5, 2011

Challenge 10 at Paper Creations Ink!!!

Hi Everyone!
Welcome to another challenge at Paper Creations Ink:
Challenge #10 "Black And/Or Orange On Your Creation"
We all know that Halloween is coming up quickly so we thought it would be an awesome idea to have a color challenge! This way you can start thinking about all of those fun Halloween Parties or Masquerade Balls that you will be attending! So be sure to use your imagination and any image for this challenge! We would LOVE to see all types of creations, whether it is a Card, Scrapbook Page, Tag, ATC (Artist Trading Card), Box, Bag, 3D ~ Altered Art, or Other Crafting Projects that has some form of paper on it!
My project is a treat box featuring a Digi from Stamp Insanity:


Our Sponsor for this challenge is Stamp Insanity! Beth the owner/artist of Stamp Insanity has so graciously offered 3 single Digi's of Your Choice from her online store!
Can't wait to see your wonderful creations!!!

Love
Julia

Sunday, April 24, 2011

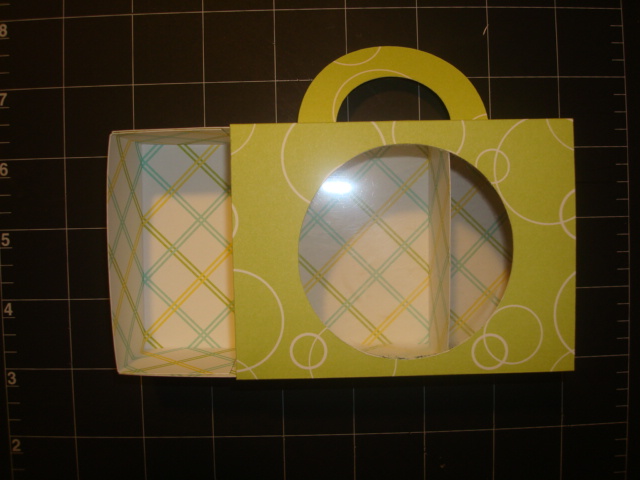
Sweet Spring Treat Box


Materials: 
  • Martha Stewart patterned cardstock: double sided
  • Ribbon
  • K & Co. flowers
  • Transparency 
  • Double sided tape

 Here is the link for the templates for Cricut using Design Studio: Download


How to:

Cut the pattern using Cricut and Design Studio. The cartridge used was Plantin SchoolBook.


Outside:

Cut ½ inch from the bottom.

Score and fold at 1 ½ inch, 4 inch, 5 ½ inch, 8 ½ inch and 9 ½ inch.

Cut a piece of transparency 3 inches x 4 inches and glue to the inside of the window.

Put double sided tape to the top flap, the one with the handle and adhere to the bottom flap closing the box.


Inside:

Score and fold at 1 3/8 inch on all sides.


 Cut as cut as shown careful not to pass the point of intersection at the corner.

 Glue the flaps to the sides forming the box.


Decorate the outside of the box.


There you have it.  Have fun with this project.

Love

Julia

Related Posts Plugin for WordPress, Blogger...